Prometheus 와 Grafana 를 이용하여 Azure 환경의 MySQL 모니터링을 구축하자!
기본적으로 Prometheus 를 이용한 모니터링을 구축하기 위해서는 Grafana, Prometheus, Node Exporter, MySQL Exporter 의 설치가 필요하다.
각각 어떤 역할을 하는지 알아보자.
Grafana 란?
ㆍ 데이터 시각화 및 대시보드 작성을 위한 오픈소스 도구이다.
ㆍ Prometheus, InfluxDB, Azure Monitor, CloudWatch 등 다양한 데이터 소스를 지원하며, 데이터를 가져와 원하는 시각적인 대시보드를 작성할 수 있다.
Prometheus 란?
ㆍ 시계열 데이터를 저장하고 검색하기 위한 오픈소스 데이터베이스이다.
ㆍ 메트릭과 레이블을 사용하여 시계열 데이터를 모델링하며, Exporter 라는 데이터 수집기를 사용하여 수집된 데이터를 저장한다.
ㆍ PromQL 이라는 쿼리 언어를 사용하며, 경고 매커니즘도 제공한다.
[influxDB 와 Prometheus 의 차이점]
| InfluxDB | Prometheus | |
| 데이터 모델링 | 스키마리스 데이터 모델 사용 | 메트릭과 레이블 사용 |
| 데이터 수집 | 직접 데이터 수집 가능 | Exporter 라는 데이터 수집기를 사용하여 데이터 수집 가능 |
| 쿼리 언어 | InfluxQL 라는 SQL 과 비슷한 쿼리 언어 사용 | PromQL 이라는 특수한 쿼리 언어 사용 |
| 메트릭 수집 | 특정 시간 간격 내에 발생한 이벤트에 대한 기록에 특화 | 동적으로 서버를 모니터링하고, 집중적인 메트릭 수집에 특화 |
| 경고 메커니즘 | 지원하지 않음 | 지원함 |
InfluxDB 는 시계열 데이터를 기록하는 데 주로 사용되며, Prometheus 는 모니터링 및 경고에 특화되어 있다.
그러나, 두 도구 모두 유연하여 다양하게 사용된다.
Exporter 란?
ㆍ 특정 애플리케이션, 서비스와 같은 단일 소스에서 메트릭을 저장(수집) 하는 오픈소스 데이터 수집 도구이다.
ㆍ Node Exporter
- 리눅스 또는 유닉스 기반 시스템의 메트릭을 수집한다.
- PU 사용률, 메모리 사용률, 디스크 사용률, 네트워크 트래픽 등의 정보를 수집한다.
ㆍ MySQL Exporter
- MySQL 인스턴스에서 동작을 하며, 데이터베이스의 메트릭을 수집한다.
- 데이터베이스의 쿼리 수행 시간, 연결 수, 테이블의 락 수 등의 정보를 수집한다.
[telegraf 와 Exporter 의 차이점]
Telegraf 와 Exporter는 기본적으로 데이터 수집기이다. 그러나, 서로 다른 목적을 가진다.
Telegraf 는 다양한 데이터 소스에서 데이터를 수집하고 가공하여 전송하고, Exporter 는 단일 소스에서 메트릭을 수집한다는 차이가 있다.
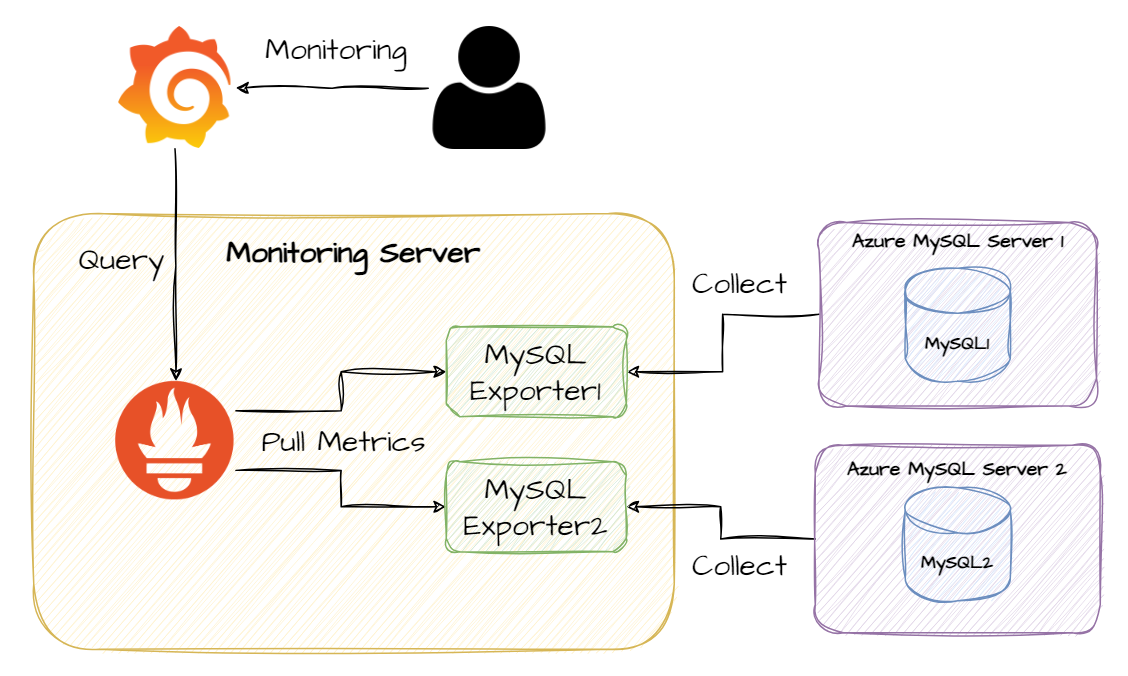
일반적인 VM 을 이용한 Prometheus 모니터링 아키텍처는 아래와 같다.
모니터링 서버에 Grafana 와 Prometheus 를 구축하고, 모니터링이 필요한 DB 서버에 각각의 Node Exporter 와 MySQL Exporter 를 구축한다.

클라우드 환경에서 구축할 경우 아래와 같은 아키텍처로 구성을 할 수 있다.
기본 VM 환경의 구축 방법과 다른점이 있다면 Node Exporter 가 필요가 없다.
Azure 환경의 경우 Azure Monitor 을 통해 시스템 메트릭을 수집할 수 있고, AWS 환경의 경우 CloudWatch 를 통해 서버단의 시스템 메트릭 수집을 할 수 있다. 그리고, MySQL Exporter 가 모니터링 서버에 있다는 점이다.

구축 테스트 환경은 아래와 같다.
1. Grafana Server
ㆍ Grafana
2. Monitoring Server
ㆍ CentOS / Prometheus / MySQL Exporter1 / MySQL Exporter2
3. MySQL Server 1
ㆍ Azure MySQL
4. MySQL Server 2
ㆍ Azure MySQL
Prometheus 설치
# Prometheus 다운로드
ㆍ 현 시점 최신 버전 2.47.2
ㆍ https://prometheus.io/download/
Download | Prometheus
An open-source monitoring system with a dimensional data model, flexible query language, efficient time series database and modern alerting approach.
prometheus.io
$ wget https://github.com/prometheus/prometheus/releases/download/v2.47.2/prometheus-2.47.2.linux-amd64.tar.gz
$ tar -zvxf prometheus-2.47.2.linux-amd64.tar.gz
# 폴더명 변경 및 기존 파일 삭제
# 폴더 복사 (깔끔한 폴더명을 위한 작업 - 필요없다면 skip 해도 됨)
$ sudo cp -r prometheus-2.47.2.linux-amd64 prometheus-2.47.2

# 기존 폴더 삭제
$ sudo rm -rf prometheus-2.47.2.linux-amd64*
# Prometheus 실행
$ cd prometheus-2.47.2

# Prometheus 실행
$ ./prometheus --config.file=prometheus.yml
# Prometheus 서비스 등록
$ sudo vi /etc/systemd/system/prometheus.service

[Unit]
Description=Prometheus Server
Wants=network-online.target
After=network-online.target

[Service]
User=root
Group=root
Type=simple
ExecStart=/monitoring/prometheus-2.47.2/prometheus --config.file=/monitoring/prometheus-2.47.2/prometheus.yml --storage.tsdb.path=/monitoring/prometheus-2.47.2/data

[Install]
WantedBy=multi-user.target
# Prometheus 서비스 시작
$ systemctl daemon-reload
$ systemctl start prometheus
$ systemctl enable prometheus
# 확인
$ curl -X GET http://localhost:9090
<a href="/graph">Found</a>.
Node Exporter 설치 (Cloud 환경의 경우 skip)
# Node Exporter 다운로드
ㆍ 현 시점 최신 버전 1.6.1
ㆍ https://prometheus.io/download/#node_exporter
Download | Prometheus
An open-source monitoring system with a dimensional data model, flexible query language, efficient time series database and modern alerting approach.
prometheus.io
$ wget https://github.com/prometheus/node_exporter/releases/download/v1.6.1/node_exporter-1.6.1.linux-amd64.tar.gz
$ tar -zvxf node_exporter-1.6.1.linux-amd64.tar.gz
# 폴더명 변경 및 기존 파일 삭제
# 폴더 복사 (깔끔한 폴더명을 위한 작업 - 필요없다면 skip 해도 됨)
$ sudo cp -r node_exporter-1.6.1.linux-amd64.tar.gz node_exporter-1.6.1

# 기존 폴더 삭제
$ sudo rm -rf node_exporter-1.6.1.linux-amd64.tar.gz*
# Node Exporter 실행
$ cd node_exporter-1.6.1
$ ./node_exporter
# Node Exporter 서비스 등록
$ sudo vi /etc/systemd/system/node_exporter.service

[Unit]
Description=Node Exporter
Wants=network-online.target
After=network-online.target

[Service]
User=root
Group=root
Type=simple
ExecStart=/monitoring/node_exporter-1.6.1/node_exporter

[Install]
WantedBy=multi-user.target
# Node Exporter 서비스 시작
$ sudo systemctl daemon-reload
$ sudo systemctl start node_exporter
$ sudo systemctl enable node_exporter
Created symlink from /etc/systemd/system/multi-user.target.wants/node_exporter.service to /etc/systemd/system/node_exporter.service.
# 확인
$ curl -X GET http://localhost:9100/metrics
MySQLD Exporter 설치 (모니터링이 필요한 서버 수 만큼 설치 필요)
# MySQLD Exporter 다운로드 (*총 2대를 세팅할 예정)
ㆍ 현 시점 최신 버전 0.15.0
ㆍ https://prometheus.io/download/#mysqld_exporter
Download | Prometheus
An open-source monitoring system with a dimensional data model, flexible query language, efficient time series database and modern alerting approach.
prometheus.io
####### MySQL Exporter 1 설치
$ sudo wget https://github.com/prometheus/mysqld_exporter/releases/download/v0.15.0/mysqld_exporter-0.15.0.linux-amd64.tar.gz
$ sudo tar -zvxf mysqld_exporter-0.15.0.linux-amd64.tar.gz

# 폴더 복사 (깔끔한 폴더명을 위한 작업 - 필요없다면 skip 해도 됨)
$ sudo cp -r mysqld_exporter-0.15.0.linux-amd64 mysql1-exporter

# 기존 폴더 삭제
$ sudo rm -rf mysqld_exporter-0.15.0.linux-amd64*


####### MySQL Exporter 2 설치
$ sudo wget https://github.com/prometheus/mysqld_exporter/releases/download/v0.15.0/mysqld_exporter-0.15.0.linux-amd64.tar.gz
$ sudo tar -zvxf mysqld_exporter-0.15.0.linux-amd64.tar.gz

# 폴더 복사 (깔끔한 폴더명을 위한 작업 - 필요없다면 skip 해도 됨)
$ sudo cp -r mysqld_exporter-0.15.0.linux-amd64 mysql2-exporter

# 기존 폴더 삭제
$ sudo rm -rf mysqld_exporter-0.15.0.linux-amd64*
# 각 MySQL 에 데이터 수집용 계정 생성 및 권한 추가
-- 계정 생성
CREATE USER 'db_exporter'@'%' IDENTIFIED BY 'password123';

-- 권한 부여 및 적용
GRANT PROCESS, REPLICATION CLIENT, SELECT ON *.* TO 'db_exporter'@'%';
FLUSH PRIVILEGES;
# MySQLD Exporter 설정 추가
ㆍ MySQLD Exporter 설정 파일에 모니터링 할 MySQL 서버의 접속 계정을 추가한다.
####### MySQL Exporter 1 설정
$ cd mysql1-exporter/

# 예민한 계정 정보이므로 숨김 파일 처리한다.
$ sudo vi .exporter.config

[client]
user=db_exporter
password=password123
host=123.123.123.123


####### MySQL Exporter 2 설정
$ cd mysql2-exporter/

# 예민한 계정 정보이므로 숨김 파일 처리한다.
$ sudo vi .exporter.config

[client]
user=db_exporter
password=password123
host=125.125.125.125
# MySQLD Exporter 서비스 파일 생성 (*주의. 각 인스턴스별로 --web.listen-address 포트 다르게 할 것!)
####### MySQL Exporter 1
$ sudo vi /etc/systemd/system/mysql1_exporter.service

[Unit]
Description=mysql1 exporter
After=network.target

[Service]
Type=simple
User=root
Restart=always
ExecStart=/monitoring/mysql1-exporter/mysqld_exporter \
--config.my-cnf /monitoring/mysql1-exporter/.exporter.config \
--web.listen-address=0.0.0.0:9104

[Install]
WantedBy=multi-user.target


####### MySQL Exporter 2
$ sudo vi /etc/systemd/system/mysql2_exporter.service

[Unit]
Description=mysql2 exporter
After=network.target

[Service]
Type=simple
User=root
Restart=always
ExecStart=/monitoring/mysql2-exporter/mysqld_exporter \
--config.my-cnf /monitoring/mysql2-exporter/.exporter.config \
--web.listen-address=0.0.0.0:9105

[Install]
WantedBy=multi-user.target
# MySQLD Exporter 서비스 시작
####### MySQL Exporter 1
$ sudo systemctl daemon-reload
$ sudo systemctl start mysql1_exporter
$ sudo systemctl enable mysql1_exporter
Created symlink from /etc/systemd/system/multi-user.target.wants/mysql1_exporter.service to /etc/systemd/system/mysql1_exporter.service.


####### MySQL Exporter 2
$ sudo systemctl daemon-reload
$ sudo systemctl start mysql2_exporter
$ sudo systemctl enable mysql2_exporter
Created symlink from /etc/systemd/system/multi-user.target.wants/mysql2_exporter.service to /etc/systemd/system/mysql2_exporter.service.
# 확인
####### MySQL Exporter 1
$ curl -X GET http://localhost:9104/Metrics

####### MySQL Exporter 2
$ curl -X GET http://localhost:9105/Metrics
Prometheus 와 Exporter 연동
ㆍ Prometheus 가 Node Exporter 의 metrics HTTP endpoint 에 접근할 수 있도록 Prometheus 가 설치된 서버에서 prometheus.yaml 파일 내용을 추가한다.
ㆍ Node Exporter 와 MySQL Exporter 를 Job 등록하여 Endpoint 를 지정해준다.
$ sudo vi prometheus.yml

# my global config
global:
  scrape_interval: 15s # Set the scrape interval to every 15 seconds. Default is every 1 minute.
  evaluation_interval: 15s # Evaluate rules every 15 seconds. The default is every 1 minute.
  # scrape_timeout is set to the global default (10s).

# Alertmanager configuration
alerting:
  alertmanagers:
    - static_configs:
        - targets:
          # - alertmanager:9093

# Load rules once and periodically evaluate them according to the global 'evaluation_interval'.
rule_files:
  # - "first_rules.yml"
  # - "second_rules.yml"

# A scrape configuration containing exactly one endpoint to scrape:
# Here it's Prometheus itself.
scrape_configs:
  # The job name is added as a label `job=<job_name>` to any timeseries scraped from this config.
  - job_name: "prometheus"
    static_configs:
      - targets: ["0.0.0.0:9090"]

  - job_name: "node-exporter"
    static_configs:
      - targets: ["localhost:9100"]

  # mysqld-exporter
  - job_name: "mysql1-exporter"
    scrape_interval: 5s
    static_configs:
      - targets: ["localhost:9104"]
        labels:
          alias: "mysql1"

  - job_name: "mysql2-exporter"
    scrape_interval: 5s
    static_configs:
      - targets: ["localhost:9105"]
        labels:
          alias: "mysql2"

  -
# 파일 적용을 위하여 재시작
$ sudo systemctl restart prometheus
$ sudo systemctl status prometheus
Grafana 설치 및 reverse proxy 설정
ㆍ 아래 내용 참고!
[MySQL] Grafana + influxDB + telegraf 모니터링 구성
Grafana + influxDB + telegraf 를 구성하여 MySQL 을 모니터링해보려고 한다. 각각의 역할은 아래와 같다. ν Grafana 란? Grafana는 데이터 시각화 및 대시보드 작성을 위한 오픈소스 도구이다. Prometheus, InfluxDB
ryean.tistory.com
Grafana 연결 및 설정
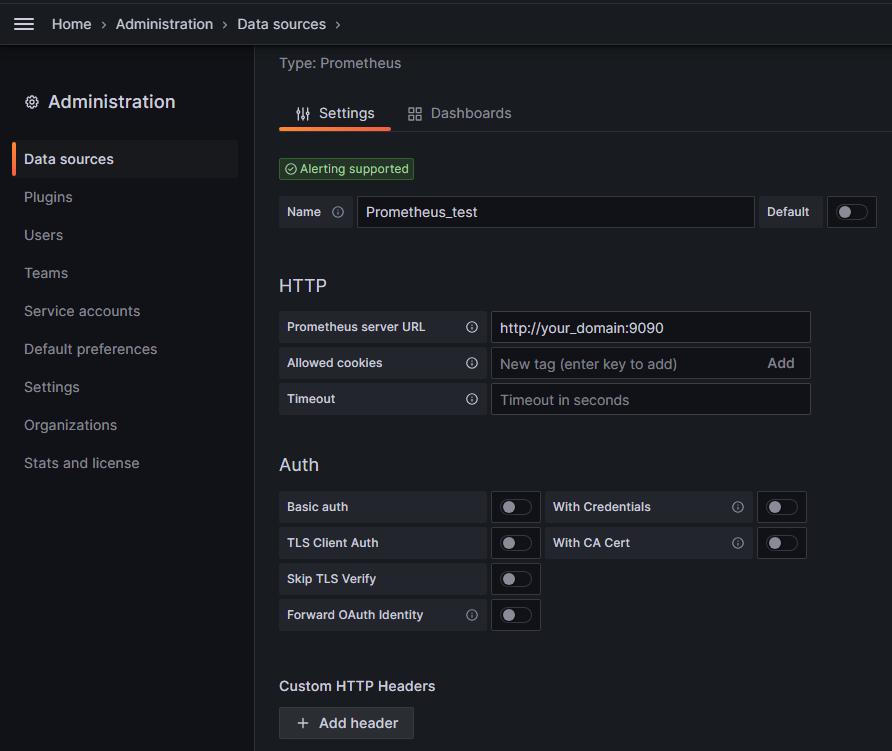
# Grafana 의 Data sources 에서 구성한 Prometheus 추가
ㆍ Name: Prometheus_test
ㆍ URL: http://your_domain:9090

이렇게 하면 Promethus Grafana 모니터링 설정을 할 수 있다.
'DBMS > MySQL' 카테고리의 다른 글
| [MySQL] 윈도우 cmd 창에서 MySQL 접속 안될 때 (환경 변수 설정) (0) | 2024.04.30 |
|---|---|
| [MySQL] Grafana + influxDB + telegraf 모니터링 구성 (0) | 2023.11.07 |
| [MySQL] sql_mode 확인 및 옵션 (2) | 2023.01.12 |
| [MySQL] 계정 비밀번호 보안 경고 (--login-path) (0) | 2022.08.23 |
| [MySQL] GPG keys issue while installing mysql-community-server (GPG Key 오류) (0) | 2022.08.04 |